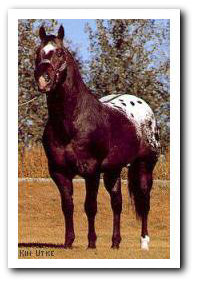
Kim's photos have have appeared for years in leading horse publications (Equus, Western Horseman, etc.) used by the Appaloosa Horse Club and Appaloosa Journal in their advertisements. They have appeared on covers of magazines, including the front cover of the May of 1982 Appaloosa Journal (photo contest winner). Her photos have won many blue ribbons and Grand Champion awards. Many of the “students” she has helped have gone on to win Championships in photo contests, and had their photos appear on covers of various magazines in turn.

|
ABC's of Equine Photography by Kim Utke
In response to the many requests received over the years on my horse photography and equipment, this page has been created. It is not meant for the professional, or even the amateur. It is an account of what I do and what has worked for me.
 Camera Camera
This is a matter of personal preference, but as Carl Miles told us when we started out with Appaloosas, “buy the best Appaloosa you can afford, even if you have to finance several years to pay for it. A sure way to lose is to buy a cheap horse and pray for a miracle.” This applies to cameras, too. If you buy the best you can afford, you will do yourself more justice than buying a cheap one and “praying for a miracle.” However, it definitely doesn't mean you need to mortgage your house to buy one. For years I used a Minolta 7000i with an 80-200mm zoom lens. It was an auto-focus camera, which is a critical feature when photographing loose horses. Horses on pasture leave you little time to set manual controls, focus, and try to capture that fleeting pose. I now use a digital Canon 5D with 70-200 mm lens.
A good quality camera (as Canon, Minolta, or Nikon), digital or film, with an 70 or 80-200mm zoom lens is a versatile combination. I use the 70mm setting for the 3/4 rear shots, 135mm for the side, and the 200mm for 3/4 front shots. Cellphone cameras have been known to capture a good photo now and then, but if you want consistent results with no distortion, single lens reflex is your best choice.
Controls
I used a manual camera for years, with having to change the f-stop (control of light hitting the film) for light or dark horses. Many great shots were missed because of having to stop and adjust settings. Switching from a dark bay colt to a light palomino or leopard usually meant a change in the settings. I would pick a happy medium and shoot at that setting (as 250 at f/8). Now that cameras are fairly automatic, I can use the total “Program” setting with good results. I still look at some of the photos from my old Zeiss Nikon camera (manual) from “eons” ago and know that they are still hard to beat. But the convenience of a totally automatic camera will capture the photos as fast as you can get in position. If you are not comfortable with manual settings, plan on using the Program setting, which will give you automatic control of the shutter speed and f-stop.
Film
This becomes personal preference, but I used Kodak Gold 200 exclusively. In the past I saw too many folks switching from 100 to 200 to 400 ASA film and forgetting to change the setting on the camera (like me!). Now, most cameras set the ASA (film speed) automatically, so again, this is not a problem. If you stick with a 200 speed film, you are fairly well covered from overcast days to bright days. And remember to shoot, shoot, shoot! With film, I was happy to get one or two great shots out of a 24 exposure roll of film! Now with digital, you can take dozens or hundreds of shots and back at the computer delete all that are not wanted. What a money saving that has been!
Camera Position
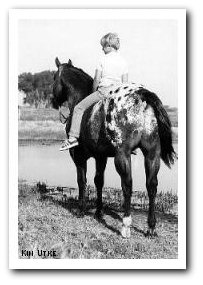
The best camera position depends upon the height of the photographer. Aiming for the middle of the horse's back usually results in a good average. A high camera position will create the effect of short legs on the horse, and a lower angle will make the horse look distortedly tall. For foals, if I think I have time and will not lose the pose, I will sometimes drop down on one knee, which in turn helps stabilize the camera and gets me down to the level of his back. For head shots, the camera should be at the lowest level, shooting upward. Dropping down on one shoulder will help. You will get more sky and less distracting background. I zoom to 200mm for head shots, which gives me the best perspective and least distortion.
Lighting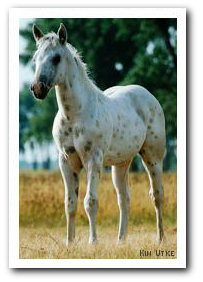
The best lighting situations are early morning (8-10 a.m.) and late afternoon to early evening (4-7 p.m.). From late morning to early afternoon (10 a.m.-2 p.m.), the sun creates shadows on the lower extremities. Trying for the least amount of shadow on the horse is best. On a posed shot (horse under halter), the shadow of your body should point toward the horse on a side view, a 3/4 front, or rear view shot. Make sure your own shadow is not in the picture!
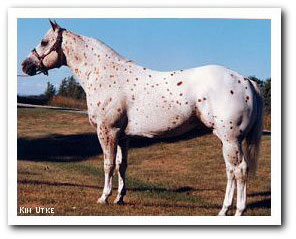
Slightly overcast days are my favorite days to take pictures. With a thin haze of clouds, the muscle lines aren't quite as prominent, but shadow detail improves and the colors are more vibrant. This works well on leopard horses. A bright, sunny day will seem to shrink the spots on a leopard horse and wash them out. Ideally, a photo of a leopard horse, taken on a slightly overcast day, and into the sun (rules are meant to be broken) will create almost a “glow” around the horse, and the spots will show up better than shooting on the sunny side of the horse.
Even if things aren’t set up correctly, take the shot anyway. The horse or foal will not hold that pose until you find a better position.
Positioning
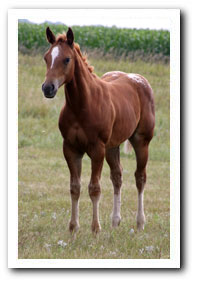
Side Shots: I watch for side shots of the foal or horse when the legs nearest the photographer are completely vertical and the off legs are visible. My rule of thumb for this shot is to see “space” between the front and back legs from knees and hocks on down. In other words, look for a triangle of space from the bottom of the knees on down that the two front legs create, and a triangle of space from the hocks on down that the back legs create. Since most folks like to see the head on the horse or foal, I like the head slightly turned to the side to show the face marking. But with horses loose on pasture, control of this isn't always possible. A head turned will make the neck appear heavier, but it sure is nice to see the face or at least part of it.
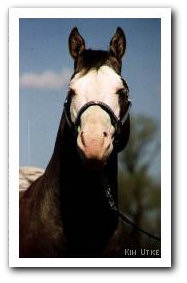 
Head Shots: On pasture and uneven ground, I usually have to drop down on an elbow or shoulder for the head shots in order to have clear sky in the photo and no other horses. I like to have the head turned about half way towards me so that the eye on opposite side of head starts to show. Straight-on head shots on horses show off the jaw, wide forehead and fox ears. This is a great shot for stallions. A straight-on head shot is when the photographer is directly in front of the horse. Most foals look best with the half-way side shot. The half-way side shot is when the photographer can see a nostril, an eye and both ears. Flat-side shots, taken when you are looking at the horse from the side and he is facing forward, show off a good profile, but most people like to see some of the face. The half-way side works best for that. Be sure to have the lens setting at 200 (or 135 on a digital SL) to eliminate distortion.
Front Shots: The front shots I like to take are actually a step or two toward the long, flat side of the horse. I call this a 3/4 front. I like to catch this one with head high, ears alert, legs vertical and completely parallel and squared up. I find it even better to have slightly more space between the two hind legs than between the two front, with all legs vertical. And, if at all possible, I like to have the front legs on a very slight rise. This view should also be taken at 200mm setting on lens.
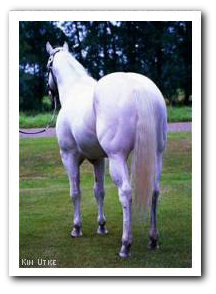
Rear Shots: Again, I call this 3/4 rear (from flat side) so as not to mean straight rear shot. As in the 3/4 front shot, legs should be completely vertical and parallel. This is the the most difficult angle to capture, especially with horses on pasture. I move in closer and have the lens set at 80mm, to avoid distortion of the head if I’m using the telephoto.
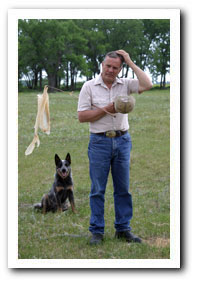
Assistants: Equally important to achieving good horse photography is your helper. Taking photos of foals loose on pasture demands that the helper immediately move into the position needed to get a horse’s attention (ears up). And of course this doesn't always happen, as he or she cannot be on all sides of you at once. We use a long stick with a plastic bag ("flag") tied to the end to get our horses’ attention for pictures. Our son, Shannon, helped until he left home, then daughter Lori helped until she left and passed the job of "waving the flag" to Dave. I think it goes without saying that being the flag-waver during a photo session is not the most glamorous job in the world! The assistant must have perfect timing to move into and away from the subjects and patience to deal with demanding photographers!
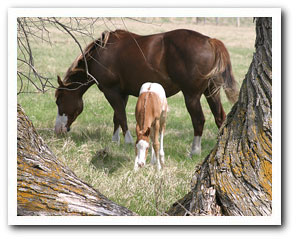
Scenics: For pasture scenes, try to frame your pictures. In other words, try to find an overhanging branch or include trees on each edge, or something elseto create a “frame” for your photo. Unfortunately this is not always possible, but if it is, it will create a better “feeling,” and hold attention to horses in the photo. Another important aspect of scenics is to incorporate an "S" curve into them if possible, as is evident in the pond scene at the top of this page. The tops of the trees, the far edge of the pond, and the land on this side create the "S" curve which gives a relaxing feeling to the photo.
Summary
Because our pastures are several miles from home, we must take a tractor and mower to the pastures and mow the grass and weeds in an area for registration photos every summer. We feed pasture cubes (pelleted protein supplement) in two long lines in the mowed area. Then we wait for the foals to come into the area between the rows of mares, so we can photograph them. Many mornings no photos are captured at all. The biggest problem is trying to keep the foals away from us so we can get their pictures. This is the only time when the people-loving disposition of our horses really gets in the way.
For equipment, I currently use the digital Canon 10D camera with 28-135 lens.
But to summarize what I used for years:
Minolta 7000i 35mm film camera (or any good autofocus)
80-200mm zoom lens
Kodak Gold 200 film
Setting:“Program”
Head shots: 200mm setting (camera low, shoot up)
Side Shots: 135mm setting
3/4 front shots: 200mm setting
3/4 rear shots: 80mm setting
Lighting: At your back (slightly overcast or near-rain for vivid color)
Simplicity: Least cluttered background possible!
Get their ears up, and SHOOT SHOOT SHOOT!
Good luck!
|